Wax alternatives and similar packages
Based on the "Install tools" category.
Alternatively, view Wax alternatives based on common mentions on social networks and blogs.
-
-
-
-
Wix Toolset
DISCONTINUED. The most powerful set of tools available to create your Windows installation experience


WorkOS - The modern identity platform for B2B SaaS


* Code Quality Rankings and insights are calculated and provided by Lumnify.
They vary from L1 to L5 with "L5" being the highest.
Do you think we are missing an alternative of Wax or a related project?


README
Wax 
An interactive editor for WiX Toolset setup projects.
Wax keeps your candle burning
While it's an easy task to create an empty setup project with the WiX Toolset, populating the list of deployable files and even more keeping the list up to date can be a very fumbling task. This tool is a Visual Studio Extension that helps you to create, verify and maintain the list of the deployed files in an interactive GUI.
Just select the projects that you want to install in the list box on the left side. Two data grids on the right will show you the target directories needed and files to be installed, and how they are mapped to the file nodes in your WiX setup project.
Files that have no corresponding item in the WiX setup project are show in red. You can add them to the setup project by clicking the '+' button in the rightmost column. Files that already exist in the setup project are shown in yellow. You can link them together by clicking the '?' button in the rightmost column. Files that already exist in the setup project but have multiple matches are shown in orange. You can link items together by selecting the proper file from the combo box.
The file grid supports multiple selection, so you can apply all commands to many files in one step.
Installation
Make sure you have installed the WiX Toolset before installing Wax!
This tool is a Visual Studio Extension. Use the Visual Studio Extension Manager, install from the Visual Studio Marketplace, or download the binaries and double click the Wax.vsix in the windows explorer.
The Wax editor is a tool to maintain WiX projects, so you should have installed the WiX Toolset.
Usage
Preparing the solution
We'll assume here that you already have a solution with some projects that you want to deploy.
The Wax editor is collecting the output of the selected project(s) to install and all dependencies to populate the files list.
In order to get the full benefit from this tool, all files that need to be installed should be part of the projects.
Files that are not generated by the build, e.g. read-me files or documentation, should be added to the project with the Build Action set to Content and Copy to Output Directory to Copy always or Copy if newer.
If you follow this pattern, you won't have to manually fumble around with additional files in the WiX project.
Create a new WiX Setup project
If you don't already have a WiX Setup project in your solution, create a new one now:
- In Visual Studio Click
File, then clickNew, then clickProject. - Choose the Windows Installer XML node in the Project types tree, then select Setup Project
- Name your project and press OK.
Open the editor
The WiX Setup Editor menu entry is located in the Visual Studios "Tools" menu.
When parsing the projects, all files of the Built, ContentFiles and LocalizedResourceDlls build groups are collected. If you want to deploy the symbol files with your project, check the Deploy symbols toggle button in the tool bar.
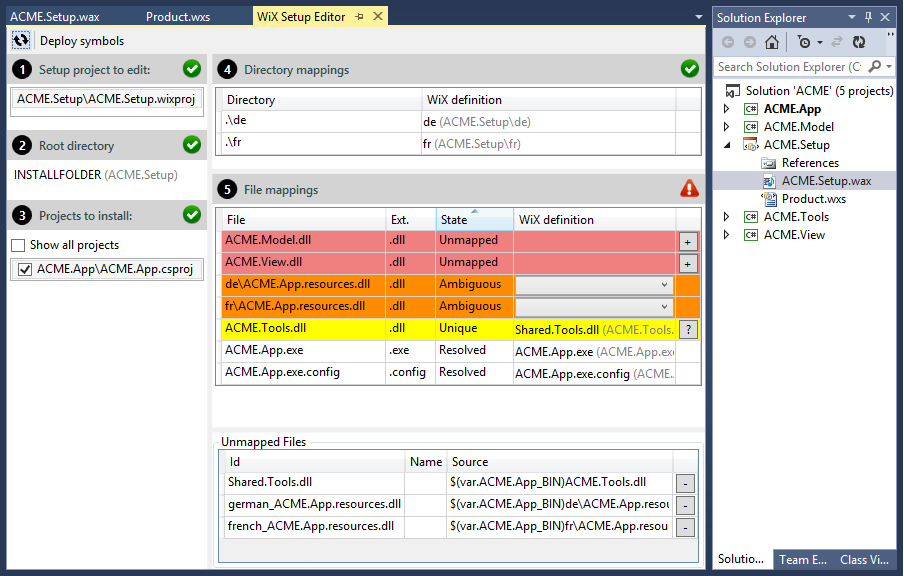
There are five sections you have to edit in sequential order. If a green check mark appears in the top right corner, this section is complete. If there is a red exclamation mark, the section needs editing.
If you have made conceptual changes to your solution while the editor is open, click the refresh button.
(1) Select the WiX project to edit.
As the first step select the WiX project you want to edit. If there is only one setup project in the solution, it will be already selected.
(2) Map the root directory.
The editor needs to know the root directory definition in the wix file. Simply select it from the items in the combo box.
If you have created a new WiX Setup project, there is only one and it is named INSTALLFOLDER.
(3) Select the project(s) to install.
Select the project(s) that you want to install. This is maybe just the one .exe project in your solution. Since dependencies are detected automatically and don't need to be selected explicitly, they are not shown in the list; also test projects are hidden by default. However if you think some project is missing here, check the "Show all projects" check box to see every project of the solution.
Every project you select will be automatically added to the WiX projects references, so the build order will be correct and you can use project reference variables in the WiX project.
(4) Create the directory mappings.
If you projects need to deploy files into subdirectories of the INSTALLFOLDER, you need to define or map them here.
If you are starting with an empty project, just click on the "+" in the rightmost column of each directory to create the WiX definitions.
If there are already directories defined in the WiX project, a combo box will appear where you can select the directory that maps to the projects output folder.
(5) Create the file mappings.
The file mappings list shows all output from the selected projects. If you are starting with an empty WiX project, all files will be shown in red and the state is "Unmapped". You can select all files and click on the "+" button in the rightmost column to create all files entries.
If you are editing an existing WiX project that you have created manually or e.g. with the "Harvest" tool, files might also appear as "Unique" or "Ambiguous". "Unique" means that there is only one file with that name in the whole solution, so it probably matches the file to be installed. Click on the "?" button in the rightmost column to confirm the match. "Ambiguous" means that there are several files with the same name. Use the combo box to select the matching file.
Post processing
Save all files
Wax adds a new file to your setup project, named <project name>.wax. This file stores all configurations you have made in the above steps. Make sure to save this file with your project, since it contains all information you need to maintain the project later. Also make sure the WiX files (.wxs, .wxi) are saved.
Check your feature tree
Wax will add a ComponentGroupRef node for all component groups it creates to the first feature it finds in your project. If you have just one feature defined, this will be fine; if you have more than one feature in your setup project, copy or move the entries as desired.
  <Product ...>
    <Feature Id="ProductFeature" Title="ACME.Setup" Level="1">
      <ComponentGroupRef Id="ProductComponents" />
      <ComponentGroupRef Id="de_files" />
      <ComponentGroupRef Id="fr_files" />
    </Feature>
  </Product>
Now you should be able to build the setup project.
Powered by Support this Project: